DIY ceramic coating application seems straightforward in theory. Watch a few videos, buy some products, and protect your paint yourself. Then reality hits. The coating doesn't cure properly, high spots appear everywhere, or the finish looks worse than before you started. Understanding ceramic coating failure helps you recognize what went wrong and determine whether you can fix it or need professional correction.
Ceramic coating failures fall into patterns. The same mistakes create the same problems across thousands of DIY attempts. Some failures are immediately obvious. Others don't reveal themselves until the coating has healed and removal becomes difficult. Knowing what failed and why guides your correction approach and prevents repeating the same errors.
Common Ceramic Coating Failure Patterns
DIY coating failures typically stem from a few common causes. Surface preparation inadequacy, application technique errors, environmental condition problems, and product misuse create most failures. Understanding these patterns helps diagnose what went wrong with your application.
The most frequent failure types include:
- High spots from uneven application or improper leveling
- Streaking from incorrect buffing technique
- Haziness indicating improper curing or contamination
- Poor water beading, suggesting inadequate bonding
- Uneven finish with varying gloss levels
- Edge buildup where the coating pooled
Each failure pattern has specific causes. High spots occur when excess coating isn't removed during application. Streaking happens when the buffing technique spreads the coating unevenly. Haziness indicates the coating didn't cure properly, or surface contamination interfered with bonding. Poor water beading means the coating didn't bond adequately to the paint.
Understanding the specific failure helps determine correction difficulty. Some problems are easily fixed with proper removal and reapplication. Others require paint correction before attempting coating again.
Why Surface Preparation Causes Most Failures
The single biggest cause of ceramic coating failure is inadequate surface preparation. DIY applicators underestimate how clean paint must be for coating to bond properly. Any contamination prevents adhesion, causing the coating to fail regardless of application technique.
Proper surface preparation requires:
- Complete decontamination, removing embedded particles
- Clay bar treatment, eliminating bonded contaminants
- Paint correction removing surface defects
- Panel wipe with appropriate chemicals
- Working in a controlled environment, preventing dust contamination
DIY attempts typically skip steps or execute them incompletely. A basic wash doesn't decontaminate paint. Using incorrect panel wipe chemicals leaves residue. Working in a dusty garage introduces contamination. These preparation failures doom the coating before application begins.
The coating might seem to apply successfully. However, contamination underneath prevents proper bonding. The coating fails prematurely, often showing poor hydrophobic properties or developing adhesion problems. By the time failure becomes obvious, the coating has healed, and removal becomes necessary.
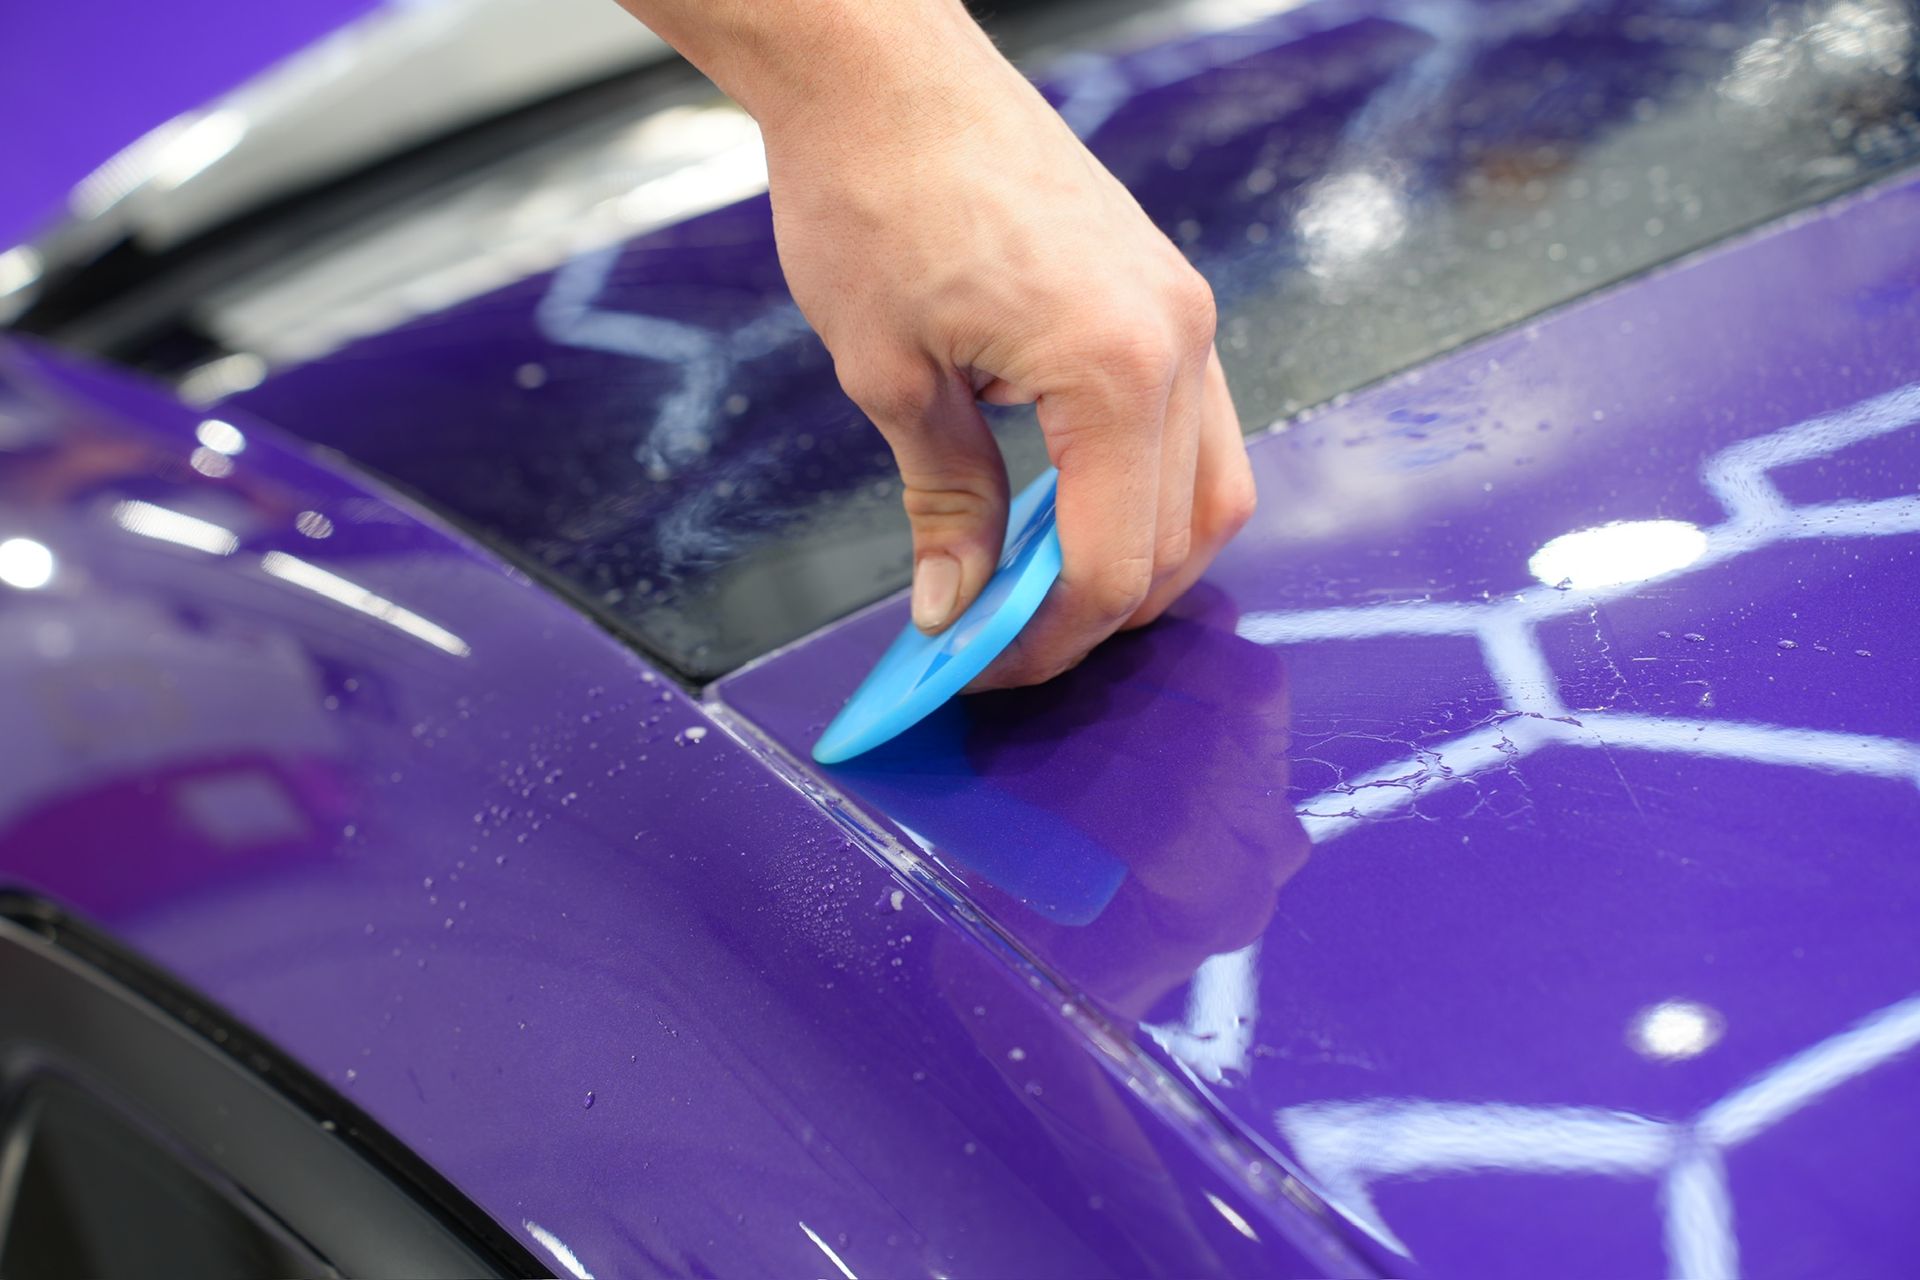
Application Technique Errors and Their Results
Even with perfect surface preparation, application technique errors create coating failures. Ceramic coating application demands specific techniques that videos don't adequately convey. Small mistakes create visible problems that compromise the entire application.
Common application mistakes include:
- Applying too much product, creating thick spots
- Working in sections that are too large, causing curing issues
- Buffing too aggressively, disturbing the coating
- Not buffing enough, leaving excess coating
- Working in direct sunlight causes premature curing
- Applying in temperatures outside the recommended range
These mistakes create the visible failures that frustrate DIY applicators. High spots from excess product, streaking from improper buffing, and uneven finish from section timing issues all trace back to application technique problems.
Professional installers avoid these errors through training and experience. They know how much product to apply, when to buff, and how to achieve even coverage. This technique knowledge comes from coating hundreds of vehicles, not from watching tutorials.
Environmental Factors That Doom DIY Applications
Ceramic coating chemistry requires specific environmental conditions for proper curing. Temperature and humidity affect how the coating bonds and hardens. Working in uncontrolled environments introduces variables that compromise coating performance.
DIY applications typically happen in home garages where:
- Temperature fluctuates, affecting the curing process
- Humidity varies, impacting coating chemistry
- Dust and airborne particles contaminate the wet coating
- Direct sunlight causes premature or uneven curing
- Poor lighting hides application problems until it's too late
These environmental issues create failures that might not appear immediately. The coating applies seemingly fine, but doesn't cure properly. Weeks later, problems emerge as the inadequately cured coating degrades or fails to perform as expected.
Professional ceramic coating applications happen in controlled environments. Temperature and humidity are regulated. Air filtration prevents contamination. Professional lighting reveals application issues immediately. These controlled conditions ensure coating success.
Identifying What Failed in Your Application
Diagnosing coating failure requires understanding what successful coating looks like and recognizing specific problem indicators. Different failures have distinct characteristics that reveal the underlying cause.
High spots appear as areas with excess gloss or thickness. They feel rougher than the surrounding coating and create an uneven texture. This failure indicates too much product application or inadequate buffing during application. The excess coating pooled and cured, creating permanent raised areas.
Streaking shows as lines or patterns where gloss varies. Light reflects differently from streaked areas compared to properly coated sections. This failure stems from buffing technique errors - either spreading the coating unevenly or disturbing the coating after initial leveling.
Haziness creates a cloudy or milky appearance instead of crystal clarity. The coating looks like it has a film over it. This failure indicates improper curing, often from working in the wrong environmental conditions or applying coating over contaminated paint.
Poor water beading or lack of hydrophobic properties suggests bonding failure. The coating physically exists on the paint, but didn't bond properly. Water doesn't bead and shed as it should. This failure traces to surface preparation inadequacy or applying coating over incompatible products.
Can You Fix a Failed Coating Yourself?
Whether DIY correction is possible depends on failure severity and coating condition. Minor issues might respond to correction attempts. Severe failures require professional removal and reapplication.
Fixable issues include:
- Light high spots that can be polished down
- Minor streaking in small areas
- Edge buildup that hasn't fully cured
Unfixable DIY problems include:
- Severe high spots across large areas
- Complete coating failure with poor bonding
- Haziness throughout the application
- Multiple overlapping failures
Attempting DIY correction on severe failures often makes problems worse. Improper removal technique damages the paint underneath. Partial removal leaves coating residue that interferes with reapplication. The cost and frustration of failed correction attempts typically exceed professional correction fees.
Professional Coating Removal Methods
Professional coating removal uses techniques and products that safely eliminate failed coating without damaging paint. This process requires understanding coating chemistry and proper removal methodology.
Professional removal involves:
- Assessment of coating condition and bonding
- Selection of appropriate removal compounds
- Systematic removal across all affected areas
- Paint inspection for damage requiring correction
- Surface preparation for potential reapplication
The removal process differs from paint correction but often includes corrective work. Failed coatings sometimes damage paint during curing. High spots might require leveling. Contamination underneath might have etched the clear coat. Professional removal addresses these issues comprehensively.
DIY coating removal attempts using random compounds or aggressive techniques risk permanent paint damage. Professional methods preserve paint integrity while eliminating failed coating.
When Paint Correction Becomes Necessary
Failed coating applications often require paint correction before recoating. The failed application process might have introduced defects. Improper removal attempts cause surface damage. Existing defects that caused the initial failure need to be addressed before trying again.
Paint correction before recoating ensures:
- Surface defects are eliminated
- Paint is level and smooth
- No contamination remains from the failed coating
- Optimal surface for new coating application
Skipping necessary corrections to save money leads to recoating failure. You're applying a new coating over the same problems that caused the first failure. Professional correction creates the proper foundation for successful coating application.
The True Cost of DIY Coating Failure
DIY coating seems cost-effective initially. The product costs less than professional installation. However, failure changes the cost equation dramatically.
Failed DIY coating costs include:
- Original product purchase
- Removal product or professional removal fees
- Paint correction if includes the removal of damaged paint
- New coating product for reapplication
- Professional installation if DIY retry fails
These costs compound quickly. Most DIY failures end up costing more than professional installation would have initially. You've spent money on failed products, removal, correction, and potentially professional installation anyway.
Beyond financial cost, consider the time investment and frustration. DIY coating application takes significant time. Fixing failures consumes more time. Professional installation saves time and delivers reliable results from the start.
Professional Installation Advantages That Prevent Failure
Understanding why DIY coating fails highlights what professional installation provides. Professional application addresses every common failure point through proper equipment, training, and process.
Professional installation includes:
- Comprehensive surface preparation in a controlled environment
- Paint correction ensuring optimal coating surface
- Proper product application using proven technique
- Controlled curing conditions for optimal bonding
- Quality verification before completing installation
These elements prevent the failures that plague DIY applications. Proper preparation ensures coating bonds correctly. A controlled environment prevents contamination and curing issues. Professional technique eliminates application errors.
At Beadz Auto Detailing, we maintain Gtechniq certification, requiring proven proficiency with their coating products. This certification ensures proper installation technique and optimal coating performance. The certification exists precisely because the coating application demands expertise that DIY attempts cannot replicate.
Preventing Future Coating Failures
If you proceed with another DIY coating attempt after fixing the initial failure, prevention strategies are essential. Understanding what caused the first failure helps avoid repeating mistakes.
Prevention strategies include:
- Invest proper time in surface preparation
- Work in controlled environmental conditions
- Follow the manufacturer's instructions exactly
- Practice application technique on test panels
- Use proper lighting to reveal application issues
- Don't rush the application process
Even with prevention strategies, DIY coating success requires conditions most home environments cannot provide. Temperature control, humidity management, dust-free workspace, and professional lighting all factor into successful applications.
Consider whether DIY coating makes sense for your situation. Professional installation ensures proper application, provides manufacturer warranty coverage, and eliminates failure risk. The peace of mind and reliable results often justify the additional investment.

Learning From Failed Coating Attempts
Failed DIY coating teaches valuable lessons about what professional coating application entails. The process looks simple but demands expertise, equipment, and conditions that tutorials don't convey.
Key lessons from coating failure:
- Surface preparation criticality cannot be overstatedHi Jo
- Application technique matters enormously
- Environmental conditions affect coating success
- Product quality varies significantly
- Professional training exists for valid reasons
These lessons help you appreciate the professional coating installation value. It's not about paying someone to do something simple. It's about ensuring complex processes are executed correctly by trained professionals with proper equipment and environment.
Many customers who experience DIY coating failure become our best advocates for professional installation. They understand firsthand what coating application demands and why professional services deliver superior results.
Making the Right Coating Decision
Ceramic coating failure reveals the gap between coating product marketing and application reality. Products marketed for easy DIY applications still require expertise, equipment, and conditions for successful installation.
Your decision path depends on your situation:
If the coating has failed, assess whether professional correction is necessary or whether you can address issues yourself. Minor problems might respond to DIY correction. Significant failures require professional removal and reapplication.
If considering coating application, weigh DIY risk against professional installation value. Professional installation costs more upfront but eliminates failure risk, provides warranty coverage, and delivers reliable protection.
Get Professional Coating Results
DIY ceramic coating failure doesn't mean your vehicle cannot receive quality coating protection. It means the application demands professional expertise, equipment, and an environment that a home application cannot provide.
At Beadz Auto Detailing, we correct failed coating applications regularly. We remove problematic coating, assess and correct any paint damage, and properly install quality coating that performs as intended. Our Gtechniq certification and controlled installation environment ensure coating success.
Whether you're dealing with failed coating needing correction or considering coating application and want reliable results, professional installation delivers outcomes that DIY attempts cannot match. Contact us to discuss your coating needs. We'll assess your situation, explain the correction or installation process, and deliver coating protection that actually works.
Frequently Asked Questions
Can a failed ceramic coating damage my paint permanently?
Failed coating itself typically doesn't damage paint. However, the failure process can cause problems. Improper removal attempts using aggressive compounds or techniques damage the clear coat. A coating that is cured with contamination underneath might bond to contaminants that etch paint over time. A failed coating that traps moisture can lead to underlying paint issues. Professional assessment determines whether paint damage occurred and what correction is necessary.
How do I know if my coating failed or just needs maintenance?
Failed coating shows specific problems that maintenance cannot address. Poor water beading despite cleaning indicates bonding failure. High spots, streaking, or haziness are application failures, not maintenance issues. A coating that wipes off with normal cleaning never bonds properly. Maintenance issues respond to proper washing and might benefit from coating boosters. Failure requires removal and reapplication.
Is it worth trying to fix the failed coating myself?
Minor issues limited to small areas might respond to DIY correction. Significant failures across large areas typically require professional correction. Attempting a DIY fix on severe failures risks making problems worse and potentially damaging paint. Professional assessment costs little and provides clear guidance on whether DIY correction is viable or professional correction is necessary.
What coating products should I avoid for DIY applications?
Professional-grade coatings requiring specific installation conditions and techniques are poor DIY choices. Products marketed as "professional" or requiring certified installation exist for valid reasons - they demand expertise and equipment for successful application. Consumer-grade coatings designed for easier application have better DIY success rates but still require proper preparation and technique. Regardless of product choice, success depends more on preparation and application than product selection.
Will coating failure affect my paint warranty?
Factory paint warranties typically aren't affected by ceramic coating application or failure. However, damage caused during coating removal or correction might raise warranty questions if the paint needs repair. Additionally, failed coating that allowed paint damage through poor protection could complicate warranty claims for paint degradation. Document coating work and any corrections to show responsible vehicle maintenance if warranty issues arise.